|
The iPhone Wiki is no longer updated. Visit this article on The Apple Wiki for current information. |
Difference between revisions of "Display Calibration Procedure"
m |
m (Redirecting link fix.) |
||
| (One intermediate revision by one other user not shown) | |||
| Line 7: | Line 7: | ||
The device being calibrated must be running a public release of '''iOS 7.0 or later.''' A device running iOS 6 or earlier will be ''irreparably damaged'' by the fixture if it is not updated first. It must be awake on the lock screen or the home screen prior to beginning the procedure, and have at least 20% battery remaining. |
The device being calibrated must be running a public release of '''iOS 7.0 or later.''' A device running iOS 6 or earlier will be ''irreparably damaged'' by the fixture if it is not updated first. It must be awake on the lock screen or the home screen prior to beginning the procedure, and have at least 20% battery remaining. |
||
| − | Additionally, the technician must have a Genius Room iMac with the latest '''IS&T iPhone Repair Image''' and a '''Display Calibration Fixture,''' connected to the iMac's Ethernet port. The Display Calibration Fixture (not to be confused with the [[3D Touch Calibration Procedure|3D Touch Calibration Fixture]]), has the ability to calibrate the Multi-Touch and proximity sensors on a device. It can also pair a new Touch ID sensor to a [[Secure Enclave |
+ | Additionally, the technician must have a Genius Room iMac with the latest '''IS&T iPhone Repair Image''' and a '''Display Calibration Fixture,''' connected to the iMac's Ethernet port. The Display Calibration Fixture (not to be confused with the [[3D Touch Calibration Procedure|3D Touch Calibration Fixture]]), has the ability to calibrate the Multi-Touch and proximity sensors on a device. It can also pair a new Touch ID sensor to a [[Secure Enclave]] processor. If required, the technician may also have a Motorola DS4208 handheld scanner. |
The device must be wiped clean and placed within the appropriate cradle, based on device model. These cradles are identifiable by small markings on each one. |
The device must be wiped clean and placed within the appropriate cradle, based on device model. These cradles are identifiable by small markings on each one. |
||
<gallery> |
<gallery> |
||
| − | Image:IP5SECradle.png|Cradle for [[iPhone 5]], [[iPhone 5s|5s]], and [[iPhone SE|SE (1st generation)]]. Marked with three concentric squares. |
+ | Image:IP5SECradle.png|Cradle for [[iPhone 5]], [[iPhone 5s|5s]], and [[iPhone SE (1st generation)|SE (1st generation)]]. Marked with three concentric squares. |
Image:IP5cCradle.png|Cradle for [[iPhone 5c]]. Marked with three concentric circles. |
Image:IP5cCradle.png|Cradle for [[iPhone 5c]]. Marked with three concentric circles. |
||
Image:IP6Cradle.png|Cradle for [[iPhone 6]]. Marked with two concentric stars. |
Image:IP6Cradle.png|Cradle for [[iPhone 6]]. Marked with two concentric stars. |
||
| Line 29: | Line 29: | ||
The calibration process takes around nine minutes total (six minutes screen/three minutes proximity). The Calibration Fixture is not to be opened during this time, even though it has built-in safety precautions if this happens. |
The calibration process takes around nine minutes total (six minutes screen/three minutes proximity). The Calibration Fixture is not to be opened during this time, even though it has built-in safety precautions if this happens. |
||
| − | During calibration, the device is wiped and flashed with a specialized firmware specifically for calibration, similar to [[ |
+ | During calibration, the device is wiped and flashed with a specialized firmware specifically for calibration, similar to [[Internal Firmware]]. The display will mostly remain white, and may flash a few test patterns. |
Once calibration is complete, the device is wiped again and restored to the latest version of iOS. DisplayCal will display a green screen with a check mark if calibration succeeds, and a red screen with a cross if it fails. If calibration fails, DisplayCal will display instructions to resolve the issue, if applicable. |
Once calibration is complete, the device is wiped again and restored to the latest version of iOS. DisplayCal will display a green screen with a check mark if calibration succeeds, and a red screen with a cross if it fails. If calibration fails, DisplayCal will display instructions to resolve the issue, if applicable. |
||
Latest revision as of 18:50, 4 January 2021
If a device's display is acting up, or has been recently repaired, it must be recalibrated using the Display Calibration Procedure.
This is a very delicate procedure which must be carried out by Apple authorized technicians only on iPhone 5, 5c, 5s, SE (1st generation), 6, or 6 Plus.
Preparations

The device being calibrated must be running a public release of iOS 7.0 or later. A device running iOS 6 or earlier will be irreparably damaged by the fixture if it is not updated first. It must be awake on the lock screen or the home screen prior to beginning the procedure, and have at least 20% battery remaining.
Additionally, the technician must have a Genius Room iMac with the latest IS&T iPhone Repair Image and a Display Calibration Fixture, connected to the iMac's Ethernet port. The Display Calibration Fixture (not to be confused with the 3D Touch Calibration Fixture), has the ability to calibrate the Multi-Touch and proximity sensors on a device. It can also pair a new Touch ID sensor to a Secure Enclave processor. If required, the technician may also have a Motorola DS4208 handheld scanner.
The device must be wiped clean and placed within the appropriate cradle, based on device model. These cradles are identifiable by small markings on each one.
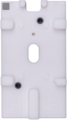
Cradle for iPhone 5, 5s, and SE (1st generation). Marked with three concentric squares.
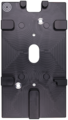
Cradle for iPhone 5c. Marked with three concentric circles.
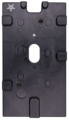
Cradle for iPhone 6. Marked with two concentric stars.
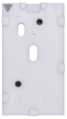
Cradle for iPhone 6 Plus. Marked with three concentric triangles.


If the device's display is not perfectly clean, oils from fingers or other sources will damage the pads on the Calibration Fixture. It is important that the technician wipes the display before and after placing the device in the Calibration Fixture.
Finally, the cradle must be locked in place with a lever and the Device-Under-Test (DUT) cable must be connected. After this, the Calibration Fixture is sealed and the procedure begins.
Procedure
The technician must power on the Calibration Fixture and confirm it is connected to the host iMac. Then, the technician will launch the DisplayCal software. The software may take up to 90 seconds to reboot and prepare the device for calibration. The software will then search an online database (presumably Display Cloud) for a Screen ID that matches the display installed in the device. Once it is found, calibration may begin.
For iPhone 5 and 5c, the interface will adjust to allow the technician to scan a 2D barcode that came with the replacement display. The technician uses the handheld scanner to input a Screen ID into a text box, and submits it for validation. Once validated, calibration begins.
The calibration process takes around nine minutes total (six minutes screen/three minutes proximity). The Calibration Fixture is not to be opened during this time, even though it has built-in safety precautions if this happens.
During calibration, the device is wiped and flashed with a specialized firmware specifically for calibration, similar to Internal Firmware. The display will mostly remain white, and may flash a few test patterns.
Once calibration is complete, the device is wiped again and restored to the latest version of iOS. DisplayCal will display a green screen with a check mark if calibration succeeds, and a red screen with a cross if it fails. If calibration fails, DisplayCal will display instructions to resolve the issue, if applicable.
Completion
At this point, the Multi-Touch display and proximity sensor are calibrated. The Calibration Fixture is opened and the DUT cable detached. The device is removed and undergoes a functional test afterwards.
Upgrading Firmware
To upgrade the firmware of the Display Calibration Fixture, a technician will need the following things:
- The Firmware Upgrade Kit, ordered by a Genius Admin and containing the following:
- 1 PICkit programmer with RJ11 cable
- 1 Mini-USB to USB cable
- 1 RJ11 port with mounting block
- 2 RJ11 port screws
- 1 RJ11 dust cover
- An iPhone power adapter
- An iMac suction cup tool
- An ESD-safe nylon probe (A.K.A. a Black stick)
- A PH1 Phillips screwdriver
- A PH2 Phillips screwdriver
- Wire cutters
- An In-Store-Use (ISU) iPhone 6 device and replacement display
The PICkit programmer is connected to wall power via the Mini-USB to USB cable, and the iPhone power adapter. It comes with the latest Calibration Fixture firmware out of the box. After this, the RJ11 cable from the PICkit is plugged into the rear RJ11 port on the Calibration Fixture. The technician must wait for the PICkit power LED to turn green, and the "Active" LED to flash blue. They will then press the button on the PICkit for 1 to 2 seconds to begin the firmware upgrade process. The process takes around ten seconds. When finished, the PICkit is disconnected and the Calibration Fixture is initialized. The firmware version can be verified within DisplayCal.
In some cases, the RJ11 port may need to be replaced. The technician must follow a service guide to perform the RJ11 Port Replacement Procedure, and make use of additional tools listed above.