|
The iPhone Wiki is no longer updated. Visit this article on The Apple Wiki for current information. |
Screen Saver
This article discusses software internally used by Apple. Acquiring a copy without Apple's consent is illegal and may result in being scammed. |
 | |
|---|---|
| Original author(s) | Apple Inc. |
| Developer(s) | Apple Inc. |
| Stable release | 6.1.2 |
| Operating system | iOS |
| Available in | English |
| License | Closed source |
Contents
Summary
Screen Saver, officially known as DemoLoop, is an app installed on the Retail Demo devices that are on display in Apple Stores and on Apple Authorized Resellers worldwide. Its sole purpose is to play a demo video on loop. The demo video that is being looped depends on the device type and iOS version. For example, iPhones and iPads may play a slightly different demo video than the Macs that are on display, and a device on iOS 10 will be playing a different demo video than a device on iOS 11. The demo videos are stored in a directory called /#Data/ within the Screen Saver app's root directory, or stored on a caching server. The videos stored in within this directory may vary depending on the version of the Screen Saver app that is installed. There is also a hidden device management page within the app that can be accessed by touching and holding three fingers on the top right part of the display simultaneously on iOS and iPadOS, or on a Mac, by pressing and holding down Command-Option-Shift-Left Arrow. The preferences page contains information about the device and the Store ID at which it is enrolled, as well as other options: run a Network Check, 'Reset' the device (does not unenroll from DCOTA, but reinstalls the demo content) or 'Remove' the device (removes all content and unenrolls from DCOTA).
Installation
While Screen Saver is officially installed through enrollment, anyone can technically install it directly from Apple by pasting a specific link into Safari. However, it is important to note that after installing Screen Saver on a normal device, you will not be able to open the app, as it will just crash instantly upon launch. If you're on iOS 14 or above, the app icon may not even appear on your home screen, and if it does it may be blank. To install it open the demoupdate.apple.com link, then tap install, or copy and paste the second link below and paste it into Safari. When it asks "Open this page in iTunes?", select 'Open'. A pop up will then appears saying, "demounit.apple.com would like to install 'Demo Update'". Select 'Install' and you should see the icon begin installing on your Home Screen. From here, you need to go to Settings > General > Profiles & Device Management. Under the 'Enterprise Apps' section, you should see a profile called "Apple Inc. - Partner Demonstration". Open it and click the button that says "Trust Apple Inc. - Partner Demonstration". From here, everything should be set up properly.
Installation Link:
https://demoupdate.apple.com/index.html
itms-services://?action=download-manifest&url=https://demoupdate.apple.com/install/6.1.2/demoupdate.plist
Enrollment of a device
The device enrollment requires a valid Apple ID with access to demounit.apple.com or the DemoUnit application. The device needs to be erased in order to enroll a demo device.
Setup for iOS, iPadOS and macOS devices
- In DemoUnit, select the registered store you want to enroll to.
- Type in the serial number and choose a category (in unsure, select Standard).
- A code will be created which should be typed in to the Setup Assistant when requested.
- Demo content will download after setup.
Setup for watchOS devices
- In DemoUnit, select the registered store you want to enroll to.
- Type in the serial number and choose a category (in unsure, select Standard).
- On a consumer Apple Watch, create the code that should be typed into the iPhone while Apple Watch setup.
- Factory demo Apple Watches do not require a code.
- Choose Wrist Demo (try-on) or Fixture Demo (merchandising stem).
- Demo content will download after setup.
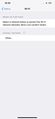
Screenshots
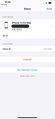
Status Page (v4.6.1)
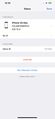
Status Page (v4.5.2)
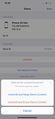
Unenroll Options (v4.5.2)
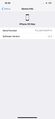
Device Info (v4.5.2)
Wi-Fi (v4.5.2)

iOS 13 DemoLoop

Old icon untill 5.2.


